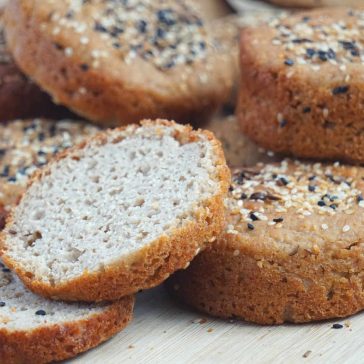
Gluten Free Hamburger Buns Recipe (Vegan, Sourdough, No Egg)
Vegan gluten-free sourdough buns made without commercial yeast or xanthan gum. Psyllium + flax create structure, while a simple flour blend (oat, buckwheat, cassava) keeps them hearty and sliceable. Bake in cups/ramekins for the best shape, then freeze sliced for easy toasting.
Servings 12 buns
Calories 143.6kcal
Ingredients
To Activate The Gluten Free Starter:
- 1 cup gluten-free sourdough starter activated
- ½ cup brown rice flour organic
- ½ cup filtered water room temperature
Dough:
- 1 cup oat flour gluten free certified
- 1 cup buckwheat flour
- ½ cup cassava flour
- ⅓ cup golden flax seeds ground
- 1 tbsp psyllium husk not powder
- 1½ cup filtered water
- ½ tsp sea salt
- ¼ cup maple sugar optional, or other sweetener
Instructions
Activate the gluten free sourdough starter:
- Combine ½ cup brown rice flour and ½ cup of water with 1 cup of sourdough starter in a medium bowl. Let the starter activate for 2-3 hours, it needs to be bubbly before adding the rest.
Form the dough:
- In a separate bowl, whisk together the water, salt and psyllium husk. Let it sit for 2-3 minutes to absorb the water, then pour the content over the starter.
- Then add the rest of the ingredients and mix together until combined.
Form the buns:
- Scoop about 1/3 cup of the dough and place it into baking cups or shape into rounded rolls (see options for baking tools in the notes below - for best results).
Proof:
- Cover with plastic wrap and allow to ferment at room temperature for 4 to 6 hours depending how warm is your house. The buns should look like they almost doubled in size. See video.
- Preheat the oven to 380 degrees Fahrenheit with a baking pan with water at the bottom of the oven (to create steam).
Bake the buns:
- Bake in the middle of the oven with a tin foil on top for 20 minutes, then remove the foil and bake for another 20-25 minutes until browned. Use the broil function for the last 2 minutes of baking, if you want a more brown surface.
- Let cool on a wire rack for at least 10 minutes, then remove from baking tray and let them cool for at least 2 hours covered. You can slice in half and freeze them if you like.
Video
If the video is not showing, you might need to disable your add blocker.
Notes
I didn’t build this recipe around perfect gram precision, because in gluten-free baking, flour brands behave differently. The goal is the dough consistency. Use the cups as your starting point, then trust what you see: you want a dough that’s soft, sticky, and shapeable.
Tips
- I experimented with the amount of water, too much water made the dough too gummy in texture and it didn't keep its shape. Too little resulted in a dry, hard texture and it didn't rise too much. Once the dough is mixed, the water will be absorbed and the dough will get a sticky, soft texture, like you should be able to stir, but not wet enough to pour.
- You can use some oil too, the fat plays a big role – it’s a powerful tenderizer in baking (but its optional), and you may need to adjust the ratio of dry ingredients in this case.
- When it comes to shaping, you have two options: either pour the batter as it is in the cups or sprinkle a little flour on a surface and form small buns by hand (but they will turn out denser). You will get the best results when using a vessel with "walls" - see video.
Best to use: - Ceramic baking cups (but you need to cover the bottom with parchment paper to prevent sticking)
- Stainless steal hamburger bun rings (use them on a regular baking sheet covered with parchment paper)
- Ceramic non-stik muffin pan (you’ll get muffin shaped buns)
- Carbon Steel Hamburger Bun Pan (I think the most convenient and optimal option)
How To Store
I simply slice them in half and place them in a zip lock bag and freeze for up to 3 months.Nutrition
Serving: 1bun | Calories: 143.6kcal | Carbohydrates: 27.3g | Protein: 3.6g | Fat: 2.1g | Sodium: 1.7mg | Potassium: 130mg | Fiber: 4.3g | Sugar: 1.5g | Calcium: 11mg | Iron: 0.9mg
